Make Your Own Hammock
Hammocks are great for the backyard, camping, backpacking, when your pregnant and on bed rest, or for turning your large capacity vehicle (in our case our minivan) into a camping vessel, more on that in this post.

We make our own hammocks because:
- It’s cheap (i.e we can’t afford an ENO).
- You can customize the size.
- It’s easy!
There are two different methods we have used for making our own hammocks. Hammock 1 involves a sewing machine, Hammock 2 does not. I’ll cover both. No matter which method you choose, both types of hammocks require:
- A piece of fabric roughly 7+ feet long and at least 3 1/2 feet wide. You can get creative with the sizing. We’ve used sturdy cotton fabric as well as twin sized sheets from the thrift store. Note: make sure the sheet is fairly new, or it might rip through in the middle of the night when your sleeping above your sons head. Just trust me on that.
- Cord, rope or webbing. You’ll need about 2-3 feet for each side. You can buy scraps at REI for pretty cheap. We use tubular webbing or accessory cord.
Hammock 1: The Sewing Machine Method
Step 1: Lay out your fabric and fold the ‘shorter’ end over to make a 4-5 inch hem. You can pin this hem in place or just fold as you sew.
Step 2: Sew the hem using a straight stitch. Then go over the straight stitch with a zig-zag stitch for extra strength.

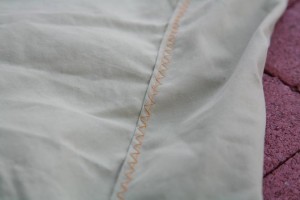
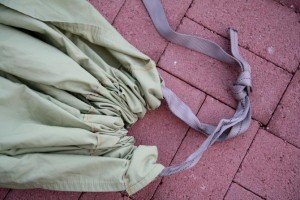
Step 3: After you have sewn both sides of the hammock thread your webbing through the hem. The easiest way to do this is to tape the webbing to a yard stick (or a fly swatter, that’s what we happened to have on hand) and push the webbing through the hem.
Step 4: Tie a knot in the webbing and repeat step 3 on the other side. Your hammock is ready.

Hammock 2: The No-sew Method
Note: For the No-sew hammock you will also need 3-4 feet of something like this 3mm utility cord.
Step 1: Fold over one of the ‘short’ ends of your fabric to make a 8 inch (non sewed) hem.
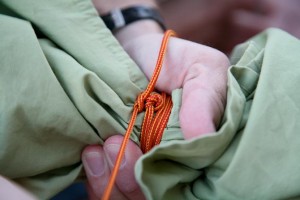
Step 2: About 2 inches from the edge of the hem, gather the fabric from both sides. Hold with your fist.


Step 3: Tie a loop with your cord, leaving a 3-4 inch tail (do this before you gather the fabric).
Step 4: Wrap the cord around the hammock where your fist is. Thread the end of the cord through the loop.


Step 5: Cinch the loop down and wrap the cord tightly around the hammock 3-4 times.
Step 6: Tie the two ends of the cord together using your favorite sturdy knot.

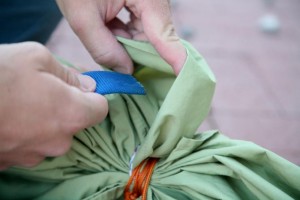
Step 7: Thread the webbing. You can thread it through by hand, or the easiest way is tape the webbing to a yard stick and push the webbing through the hem as seen in Hammock 1.
Step 8: Tie a knot in your webbing, repeat steps on the other side. Your hammock is ready.

Good luck. Let me know if you have questions. This tutorial was harder to write up than I thought, if all else fails follow the photos!

90 Comments so far
Comments Feed
Awesome! Now to find two trees…
Liv – Ya wish I would help with the two trees. I could use a few of those myself!
So excited about making my own hammock! I think I’m going to hit the thrift store and find a funky and cheap sheet.
Brandi – Great! I’d love to hear how it goes!
I would imagine you could get some pretty funky hammock colors by making your own. This is great. Now time to figure out how to install in the bed of my Tacoma.
Travis – I like where your head is at!
Hammocks are the most comfortable bed. I have neck and shoulder problems while I was using my hammock as a bed (put it up in my room in highschool) no problems. and fabric is so much more comfortable then those stinky criss crossy kind.
Beth – You need one of these on your deck!
This is _brilliant_. I’ve been drooling over expensive hammocks for years and (despite the fact that I make my own clothing and soap and cleaning stuff and and and…) it somehow never occurred to me to, y’know, make my own hammock.
Thank you!
Kate – Haahaa, I love it! Can’t wait for you to add hammock making to your repertoire!
Step one for my minivan overhaul. Thanks Lindsey!
Haaha. Your welcome Jen!
Oh, you win again. I just love how your brain works. I’m excited to try this. I need to sew though – since I can’t tie a sturdy knot, which might slow me down, but I’m determined to try it.
So cool.
Liz – Ya, well this was another one of Joe’s ideas. I’m not that creative, and it’s not fair!
I have always wanted a hammock!!! I think I might finally get one with your great post showing me how to make it!
Mary – Glad we could be of use. If you make one, I’d love to know how it turns out!
[…] Hammocks are great for the backyard. They provide you with a possibility to refresh yourself a bit outdoors. You may ask why to bother and make a hammock by yourself when there are so many of them available on the market. There are answers for that. Making your own hammock is cheaper, you can customize it to the size you need and that’s easy. There are two methods to make a hammock. One of them involves a sewing machine, while the other does not. No matter which method you choose, both types of hammocks require: a piece of fabric roughly 7+ feet long and at least 3 1/2 feet wide, cord, (rope or webbing). You’ll need about 2-3 feet for each side. You can buy scraps at REI for pretty cheap. We use tubular webbing or accessory cord. For instructions visit Outside Mom. […]
[…] The backyard is where you relax and spend a lot of time there just to unwind, but there are other things that maybe you can do in your backyard. Creating the hammock itself may be one attractive solution for you to test, you can customize the size you need and it’s easy because you can do it all alone with some instruction in the rocks there. The first method to make a swing, Things you should consider in making a hammock that is you need a piece of cloth about 7 feet and a minimum of 3 1 / 2 feet wide, can be either cable or webbing strap. You will need about 2-3 feet to each side, it is intended to maintain the balance on each side. Or you can buy the rest at REI with a fairly cheap price. As an example were performed using tubular webbing or cable accessory. Learn more instructions in Outside Mom. […]
[…] 100 times to make sure it would hold my weight and then string laundry line through each end, but this tutorial from Outside Mom is probable a more sure-fire way to go about making your own. In any case, I highly recommend […]
[…] you’re interested, OutsideMom.com offers instructions on how to make a hammock for yourself. […]
thank you , soo useful !
[…] les 2 marches à suivre sur le blog de Outside Mom et une fois le week-end terminé, rangez le précieusement dans un sac dans l’attente de […]
[…] some funky fabric and bright webbing, it’ll be great, and cheep. Here are instructions on how to make a hammock. A great gift idea for just about […]
What material do you use to make it?
Erin – I generally use cotton, the example in this post is a bed sheet, but you could pretty much use any sturdy fabric. Let me know if you have more questions!
[…] posts” but the number over there is based on page views..not necessarily OUR views. That build your own hammock one really took […]
I really love this post! Can’t wait for summertime! =D
Kimberly – Thanks! And I hear ya, I can’t wait for summer either. I look forward to hammock season every year :).
[…] # of blessed, blessed blog-saving contributers 211 – # of times our most popular post (make your own hammock) was shared on facebook and […]
I LOVE this!!!! I am a vet who is married to a soldier and is stuck out in a land locked state, and for this florida girl who slept most of her child hood in a hammock i cant wait to get back… This idea is wonderful and super affordable on any budget thanks!!!! Keep them coming!!
Ashlee – Thanks for leaving a comment. I do hope you make one, I just spent the afternoon in mine. Sure makes having a small urban sized back yard a little more bearable. 🙂
Got the materials for everything so it will be done within the week!!! Thanks again!!! Keep em’ comming!!!
Oooh, love this! I sew, and sheets are a beloved material here for larger things. I can’t believe I never thought of this! we have a lot of large trees here on the farm, and I will have at least one hammock up in the next week or two….as soon as I find some rope, lol, or convince hubby to get me some…
Making this for my boyfriends birthday on Thursday. I’m gonna set up a bug net over it, so we can sleep under the stars. He loves camping, so it’s perfect. Thanks for the awesome tutorial!
Btw, can I use a fleece blanket for the base so it’s nice & cozy? It seems like it’d be more than strong enough.
Joi – You know, I’ve never thought to use a fleece blanket. My first thought would be that it’s too stretchy, but I don’t claim to know a lot about fabric either. I say give it a try, you never know, and let us know how it turns out!
what about layers, just in case the fleece is funky just use a layer of cotton. I rate I’m going to tie die mine! teehee, I just want a hammock for study break nap times! 😀
http://www.motherearthnews.com/Do-It-Yourself/1984-07-01/Fold-Yourself-a-Hammock.aspx
I just made this hammock tonight and my kids and I had a lovely time swinging in it. Thanks for the super easy directions! I had a bunch of woven ikat from
Guatemala so the hammock looks very tropical.
Heather,
I’m so glad it worked out! And your choice in fabric sounds WAY cooler than the bed sheet we used. I’m going to have to get more creative in that department. 🙂
[…] is not really the right word… but you get my point. Aside from having a hammock in the yard there were days when Joe would come home from work, pack up the hammock, the […]
LOL yes it does look pretty. I had it left over from my baby sling and wrap business. The economy did me in. I already cut it in the width so I had to sew it back together to make it wide enough. It’s still super comfy though. I have a whole bunch of it so I’m going to make another one in a different color.
[…] Hammock […]
[…] make this project (with or without a sewing machine) so we are going to focus on the no-sew method. CLICK HERE to view the Make Your Own Hammock project on Outside Mom Materials […]
I just wanted to let you know that I think you guys have incredible ingenuity and I’ve linked to your site in several of my posts. Great job!
This is great! I’ve been looking at hammocks for about a year now and between the price and the beige-ness of the store bought ones just couldn’t let myself buy one. I made the sewing version in 1 hour yesterday afternoon using a left over king-sized flat sheet. I folded it in half length wise to give it some more durability and control the width some. I hung it in the corner of our deck from the railing. It was a HUGE hit. My endlessly energetic 10 year old actually fell asleep in it after school! Best 1 hour and $4 I have spent in a while. Now I have to dig through the closet and find another old sheet to make one for the other corner of the deck so I can have my hammock back.
Jennifer – I’m so glad! And I like the idea of folding it in half for extra durability.
This is great! I’m wanting to replace my couch w a hammock. Any cheap solutions for a hammock stand? I want to put it up in my living room
Kinda dumb question but how many pounds do you think it will hold. And how sturdy are these methods?
[…] books. But not necessarily on your couch. Pack a hammock and a backpack full of books and find a nice natural area to hang out for […]
This is great! I made one last night and it works fantastically. Just wrote my own blog post on it, complete with pictures: http://sarah-chayil.blogspot.com/2012/06/just-hanging-around.html
Hey Sarah – I just tried to leave the following comment on your blog but it wouldn’t let me! 🙂
“That looks great!! And I love the fabric you picked, nicely done!!”
I saved the sheet from the pile of drop cloths in the laundry room. 🙂
[…] out the step-by-step instructions at OutsideMom! EmailPrint Pin ItLike this:LikeBe the first to like […]
Wow, this is an awesome post. I’m very eager to make my own hammock 🙂 I bought the one from walmart, but it makes too much noise being polyester :/ Hopefully I can salvage some fabric from my mother and throw one together! Love this. Great way to recycle old sheets and whatnot 🙂 have a good day!
We made the sewing version, but the edges aren’t taut. Did we do something wrong? Is there any way to make it more “pocket-like”?
Hmmm, I haven’t run into this problem before. I guess I would first suggest you check to make sure your fabric is square (or rather a rectangle) and that your seams are straight. If everything is square then it may be something strange with your fabric. I have not tried what I am about to suggest but… you could play with changing your seams so they are curved, so at each end of the hammock the seam is a curve forming an upside down ‘U’. I imagine this could help pull up the edges so they are tighter and the hammock feels more like a pocket. Give it a try and let me know how it works.
[…] Check out the step-by-step instructions at OutsideMom! […]
My son has Autism and loves the fabric hammock in therapy.. Im going to make my own for his bed room.. I will use a stretch fabric for compression.. Thank you so much for these ahhhhhmazing instructions..<3
Erin – Thanks for the comment! I’ve never heard of this type of therapy, so I’m glad you mentioned it. Good luck with your hammock making!
[…] to hold my water jug. Two trees that are placed ‘just so’ to hold up my hammock. A branch that was destined to serve as a hanger for my drying dish […]
This post has made me keen to make a hammock and set one up in our backyard. The instructions look easy to follow.
I guess from your comment about the sheet being fairly new to prevent landing on your son’s head you are speaking from experience.
I’m thinkin’ a tie-dyed hammock is soon to be in progress for my room. 🙂
How and where did you attach this in your van? I’m thinking if doing this in 2004 Honda Odyssey
HI Amy,
This is how we attached it to our van http://outsidemom.com/2011/05/minivan-turned-rv/ it’s worked out pretty great for us! But then again, we’re pretty short. If your tall I hear this does not work out so well 🙂
[…] back, “enjoyable” is not really the right word… but you get my point. Aside from having a hammock in the yard there were days when Joe would come home from work, pack up the hammock, the kids… […]
[…] Bring a few props and let them fend for themselves while you relax in camp (set up a hammock–nothing so comfortable when your belly is big!). We’ve discussed before how to wash a […]
Should I need to invest in a high thread count to insure sheet strength or what?
HI Mic – I’m not sure what the thread count is on ours. We got the sheets at a thrift store, but they seemed fairly thick and new. We have never broken through one, but then again we are pretty small people and our kids use the sheet ones most of the time (the sides are taller so they can goof off all they want and not fall out). If you’re worried I’d invest in a big piece of fabric. Head to the fabric store and go strait to the clearance bin. You can get fabric just as cheap.
Brilliant, I have my week-end project now.
i am going to create my own little place near this creek. I wanted to make my own hammock and i found this website! Love the idea, i am definitely going to try it
[…] can buy them for as little as $25. Check out this one at Target. Or you can make your own, if you’re […]
Do you mind if I in this?
It should have said, Do you mind if I “Pin” this on pinterest? It is easier to keep track and find this again so I can make it. Thanks for sharing.
Donna – Please pin away!!! In fact we need to get a ‘pin it’ button on the site. Thanks!
I’m making a tiki bar for my hubby…. Father’s Day and all. So in sted of a true bar I am making hammocks for seats. Lol thanks u saved me big bucks.
Shelby, Hahaaa. I love it, glad we could help!
Awesome idea. I’ve wanted a hammock for years but i don’t like the rope kInd. This is something I can easily make. I’m excited!
For the mini-van hammock, why couldn’t he have put up two hammocks and just do them straight from front to back?
[…] started packing our homemade hammock and our rope swing on every campout and day trip. EVERY trip. In fact I tried to get my husband […]
[…] Source […]
There’s certainly a lot to know about this subject. I really like all of the points you’ve made.
[…] source […]
[…] DIY project and photos credit to outsidemom.com […]
Hi Lindsey- I have been dreaming about doing this (literally, i think about it while I sleep!) and yesterday I woke up with a breakthrough! I used regular twin sheets off of my kids bed and then used some retired tubular webbing to tie a double sheet bend (really basic knot, sounds more complicated than it is!) to the sheet. This leaves the running end of the webbing free to go over the roof of the car or tie off to a tree…
The reason I really like this is that I can just untie it in moments and put the sheet back on my child’s bed after the trip and it is really easy to adjust the length of the hammock based on who is sleeping in it on a given night. Thanks again for providing the idea!
[…] outsidemom.comForget discomfort: in certain situations, sleeping on the ground can be downright dangerous. Stay out of harm’s way without breaking the bank with these DIY hammock tutorials. […]
[…] outsidemom.comForget discomfort: in certain situations, sleeping on the ground can be downright dangerous. Stay out of harm’s way without breaking the bank with these DIY hammock tutorials. […]
I need a way to hang it indoors or out!!!!
[…] have layed in his, I just haven’t been able to justify buying a new one. Here is an easy tip for making your own hammock from stuff you have at […]
[…] problem? They tend to be a little pricey starting at around $100 each. The solution? Make your own! Outside Mom has tutorials for both those with sewing machines and those without. As long as you have two trees […]